
Snowblower/Lawnmower Main Jet Assemblies (High speed adjusting screw) -
|
| A Tecumseh snowblower/lawnmower carburetor main jet that is completely clogged with varnish deposits. The fuel inlet port is barely visible |
|
| Here is the snowblower main jet assembly after being wire brushed. The fuel inlet port (the big hole) is still clogged solid |
|
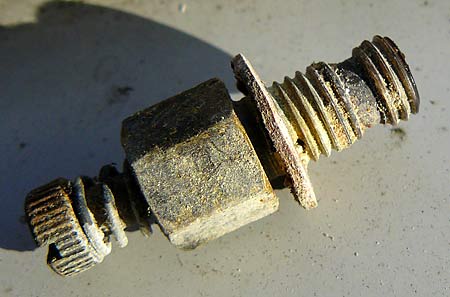
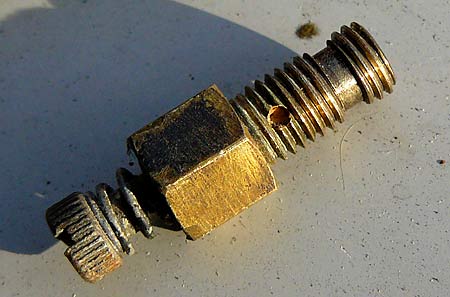
| The complete snowblower/lawnmower main jet assembly, as used on older or higher powered engines. The needle valve is pretty crusty. The strand of wire will be used to clear out the small bleed hole. |
|
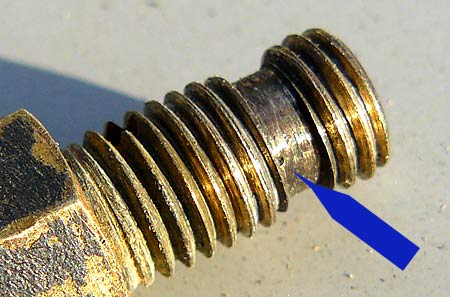
| The idle transfer passage (small bleed hole) is now visible, but still blocked solid |
|
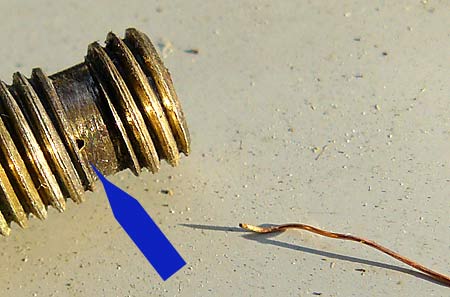
| The small bleed hole is now cleared. You've got to take a thin piece of stranded wire and cut out one of the strands. The smallest pin in a sewing box is still too big |
Does your snowblower/lawnmower Tecumseh engine start then die after priming or starts, but runs poorly and seems like it is getting tired or down on power or losing power? If the plug is clean and compression and spark are good, the main jet or High Speed Adjusting Screw assembly as it is called in the book may have clogged ports.
With the amount of Ethanol used in today's fuel the ports tend to clog up with varnish deposits quite easily. If the engine has been sitting with old fuel in it, one or more of the ports will almost certainly be clogged with varnish.
Look underneath the carburetor float bowl. There should be a 7/16" hex fitting. On newer motors it may be 1/2". There may be a screw and spring beneath it, or not if it is a fixed jet assembly. Either way disconnect the fuel line from the carburetor and plug it to minimize the fuel spillage. Put some paper towels under the carb and unscrew the jet assembly with a 7/16" open end wrench. Catch as much of the gas as you can and put the fuel soaked rags outside (it is best to do this outside). If it is a fixed jet (it would look like what you see in the photos without the screw and spring. There may also be no small bleed hole present), use a wire brush to clean it off and if it is caked with varnish gently take a couple of drill bits with your fingers and clean out the holes. Use eye protection and blow them out with air or carburetor cleaner.
If the jet is adjustable, screw in the screw/needle valve until it stops and count the turns. It should be about a turn and a half (1.5 turns out from fully seated)). Turn it out all the way and clean everything off with a wire brush. Gently use a pick or drill bit to clean out the jet and large hole on the side (the fuel inlet hole).
Now, look very carefully at the area without threads. On the lower part of that smooth area, right where the threads start again is another very tiny hole, the idle transfer passage. It can be VERY hard to see. If this is blocked it will idle like crap and be down on power at full throttle. Take a piece of stranded wire and cut it, then pull out the strands. It should be fairly fine gauge wire. Use the strand to poke through the hole. Believe it or not the smallest sewing pin you can find will be too big. If the hole is really badly clogged, you may need to use steel rather than copper wire as the copper is not stiff enough and will bend as you try to force it through. Once you've got it poked through and clear, spray it out with carb cleaner, being sure your eyes are protected and that all the holes are facing away from you. Watch to make sure the carb cleaner comes out that hole too. If for any reason you cannot force a piece of wire through that hole, take the jet assembly to a small engine supply place and buy a new one. They are not very expensive.
Reassemble, and turn the jet in all the way, then screw it out the same number of turns you counted before you took it apart. If you forgot, start with 1.5 turns out. Start the snowblower or lawnmower and let it warm up for a few minutes. Advance the throttle to full power. Turn the main jet (the screw on the bottom of the carburetor) in until the engine starts to stumble, then slowly turn it out until it smoothes. Continue turning the screw out until it starts to roughen, then slowly back until it smoothes out again. Leave it there. If it is warmer when you are adjusting the carburetor than when you will be using it (like with a snow blower) you may need to readjust it. When you use it in colder temperatures it will need to be turned out slightly until it speeds up and runs smoother.
Use of ether for starting - If you do find at some point the engine is hard to start, rather than use ether try carburetor spray cleaner. Give it a 2 second squirt into the intake, or if it requires too much dissasembly to get to pull the plug and spray it in the cylinder and quickly replace the plug and wire. Ether has more BTUs than carb cleaner, but carb cleaner lingers a little longer and doesn't all burn the first time it lights, so you should have a couple of pulls or more with an ignitable mixture to give you a better chance of getting the engine started. Carburetor spray cleaner is also less explosive and kinder to your engine's internal components. If your engine doesn't start, or stops running, it is a good tool to help determine if a startign problem is spark or fuel related.
A very good reference for working on these engines is the Mechanic's Handbook, 3 to 10 H.P. and OVM120 Tecumseh Engines, Form 692509. According to Amazon it's out of print but surprisingly I found it on the shelf at the local Barnes & Noble bookstore. It is invaluable if you want to do the work yourself.
Good Luck!
Once you've had enough fun getting your machine fixed up and running, visit my Aviation and Military Museums Directory. Why? Well Why not!!!
Back to Tecumseh Lawnmower Snowblower Engine Floods or Leaks Main Page