|
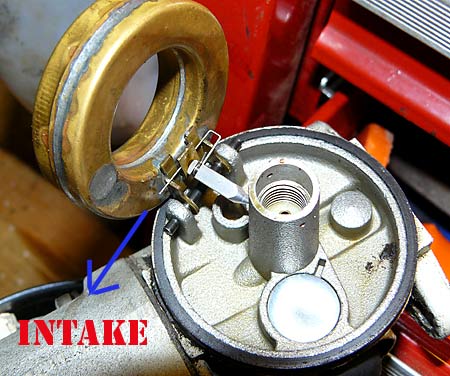
| If the clip holding the inlet valve needle to the float is not pointed towards the intake/choke end of the carburetor, the needle valve may stick causing gas to leak out of the carburetor intake. |
Recently the carburetor on my old Wheelhorse/Toro snowblower started leaking gas (or petrol if you're in the UK) out the intake and flooding the engine. I had stripped the carburetor twice and replaced all the gaskets and O-Rings in an attempt to fix it with no improvement. I went through the Tecumseh small engine manual trouble shooting section and the found that the of the recommended solutions the only thing I hadn't tried was replacing the float inlet valve needle seat. I figured it was either cracked or deformed but when I examined it under a magnifying glass it looked fine and with the carb upside down and the valve seated I couldn't blow through the fuel inlet pipe into the carburetor. It had run well for two days before starting to run rich, then flooding and fuel leaking out of the carb intake when it was shut down.
I went online and after going through page after page of useless results came upon this page from JR Combs:
http://www.lawn-mower-shop.com/carb1.htm
He mentions that the pointed end of the inlet valve clip must be pointing towards the carburetor intake or else it may bind and flood or leak. He also said that looking at it there was no way he could see how it made a difference, but for many rebuilds where a leaking flooding carburetor was the issue, that solved the problem.
I had a close look at it and he's right. Looking at it there is no way it could make a difference. But I assembled it again with the pointed end towards the carburetor intake and put everything back together. Guess what? No more leaks and no more flooding. I couldn't believe it.
So if you experience flooding or leaking gas/petrol from your lawnmower or snowblower with a Tecumseh carburetor and are looking for a solution, make sure that clip is assembled the right way around. But first check the following:
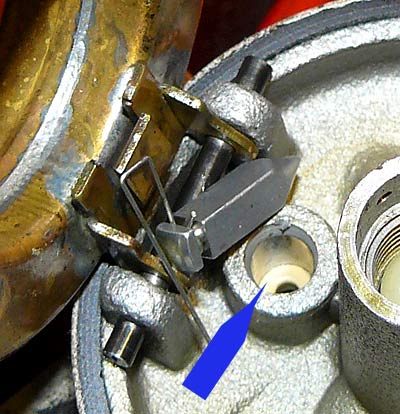 |
| The neoprene or nylon like inlet valve seat for a Tecumseh snowblower or lawnmower carburetor. You want to install it with the smooth side out and the side with the ridges in. |
Inlet Valve Seat - There is a slight possibility that this could be a cause of the carburetor leaking. It is a small round piece of fuel resistant plastic or rubber about the shape of a pencil eraser, but a little smaller. The pointed end of the inlet valve seats against it. It should be free of cracks and deformities and it should be THERE. Look down the hole that the inlet valve slides in to. At the bottom should be the seat, it could be orange or white, but it WILL be a different color than the metal of the carburetor. It will have a tiny hole in the center. The side that is smooth should be facing the needle valve and the grooved side should be facing into the carb as you install it. If you are not sure if it is there, take the inlet valve and slide it into the hole. Push down on it while looking at it closely. It should go down a tiny bit and spring back because the seat is softer than the carburetor body. If it does NOT spring back and the bottom of the hole looks the same color as the carburetor body and the hole is larger than a pencil lead, the seat is MISSING. This can happen if compressed air was used to blow out the inlet circuit. If you are not careful the inlet seat will be shot out of the carburetor like a bullet, and if your garage is like mine you may never find it again. If it is missing, the carburetor will flood and leak gas (petrol) like a sieve. If you do need to change it, compressed air at the fuel inlet fitting will blow it out, but make sure the seat hole is not pointing at you or anyone else when you do it. Use a rag to catch it. Otherwise, a hooked length of wire can be used to pull it out, but do be careful not to scratch the walls of the hole it seats in. To replace it, use a blunt punch and some light oil or vaseline and tap it down gently until it seats.
Oil - A couple of people asked about what weight oil should be used. My Tecumseh small engine manual recommends 10W30 and states NOT to use 10W40. I replace mine each season. If there is a filler plug for the auger gearbox, fill it with a good gear oil (85-90wt - newer machines use a heavier oil, You will need to look up which oil your auger gearbox uses for your particular snowblower). If the seals are gone and it leaks out, fill it EVERY time you use it. Auger gearboxes are VERY expensive.
If your snowblower or lawnmower smokes, check the oil level every time you use it. White or gray smoke is oil and can indicate worn or broken rings or that the oil level is so low that the oil is burning up and the engine is about to seize. Black or dark smoke is excess fuel an indicates the mixture being too rich or the float inlet needle valve sticking open. Be sure not to overfill with oil as it will leak/blow out the breather. If you did have a problem of gas/petrol leaking out of the carburetor, be sure to check the oil level. If gas somehow leaked from the carb through the intake to the cylinder head, it could have gotten into the engine and past the rings into the crank case. If the oil level is very high there may be gasoline in the crank case. If that is the case it is very important to drain the oil completely and refill with fresh oil. If you think that has happened, first disconnect the spark plug and slowly turn the engine over a few turns with the pull cord or manually to make sure the cylinder isn't full of gas. If it comes to a hard stop, remove the spark plug and turn it over a few times until the gas is expelled. Each time you start your snow blower, give it a few minutes at idle to warm up the oil and cylinder before blowing any snow.
Snowblower tidbits:
NEVER stick your hand in the chute or auger area to clear snow. If the auger is jammed against ice or snow, there is built up energy waiting to be released, just like a compressed spring. Even with the engine off, the auger or impeller can spring back when the jam is loosened (this is not bullshit). A friend of mine who works at the local hospital's ER hates when it snows because every time it does 3-6 people come in without fingers. Keep a snow brush or wooden stick handy for clearing blockages. I had the auger spring loose one time when clearing it with the snow brush and it put a good gouge into the wooden handle and surprised the crap out of me. Had I tried that with my hand I'd be typing this with one hand rather than two. No matter how cold, wet, late, impatient, or pissed off you are, DON'T clear snow from a snowblower chute or auger housing with your hand.
BEFORE the snowstorm - walk your driveway and pick up any sticks, stones, roadkill or other debris that could get scooped up into the snowblower. Yes, it's a pain in the butt, but it's a much bigger pain in the butt when you are trying to extract the rock or stick that has jammed in the auger which at that point will be full of snow and ice.
Shear bolts for the auger - before the snow season starts, buy 5 of them. I strongly recommend pulling one off and taking it to the hardware store or garden center and match them up. They are NOT all alike. When you have 12" of snow on your driveway and your snow blower no longer blows snow is not the time to learn you've bought the wrong sized shear bolts. Learn where they are on the auger shaft (there are either two or four shear bolts on a 20"+ snowblower) and memorize what type and size wrenches you need to undo them. On mine it is a 1/2" nut and bolt head. I use a 3/8" ratchet, a 6" extension, a 1/2" deep well socket and a 1/2" box end. When you are ready to clear your driveway lay them out on a workbench in your garage before you start. You will also need a hammer and a punch smaller than 5/16" to knock the sheared bolt shaft out of the auger shaft. When (and I do mean WHEN) you shear one off, the engine will keep running but the snow will either stop blowing or blow half as much if the pin for one side of the auger shears off (you'll see half the auger spinning and the other half stationary when one of two shear bolts snaps). Shut the engine off and clear out the snow with a stick or snow brush (NOT your hand!). Make SURE it is clear of snow and ice and everything turns easily before knocking the sheared off pin out of the auger shaft. The auger will turn freely on the shaft at that point. Turn it slowly until you see the sheared off shear bolt which will be shinier than the shaft. Line the hole up with the shear bolt and knock it out with the punch and hammer and retrieve the broken bolt shaft. Insert the new shear bolt and tighten until it is hand tight. Don't over tighten or it will snap off, which is what it is designed to do. DON'T replace it with a regular bolt. It's stupid, dangerous, and while it may save you a buck it could trash your snow blower the next time a rock gets caught up in there. Oh, and try to find the broken bolt parts. They can jam your auger up and shear another shear bolt just as easily as a rock or stick can do it.
WD-40 - spray this in the chute and auger before you start, and after you are finished. It will help keep the snow from sticking to the inside of the auger housing and the chute. Spraying it in afterwards will help keep rust from spreading. Silicone spray works too but it's more expensive and I haven't been able to find it in bulk cans like you can with WD-40.
The colder the better - When the temps get up to and over freezing most snow blowers don' t work for crap. The snow lumps up and sticks to everything and clogs the chute. If it stops snowing during the day and it has warmed up to near or above freezing (32F, 0C), if at all possible wait overnight and do it first thing in the morning when it has gotten below freezing again. The job will go much faster and easier. If you do have to blow snow when it has warmed, take smaller passes, like 1/2 to 1/3 of the width of the auger housing. And keep spraying the chute with WD-40. If the end of your driveway gets plowed in with snow that has road salt in it do that first. Two reasons to do this. One is that if it is going to be warming up while you are working the heavy, maybe slushy plowed stuff will be lighter and drier when you start than when you finish. The second is that once that is done you will only be running clean salt free snow though your machine leaving it cleaner and cutting down on the rust build up (be sure to spray the auger an d chute with WD-40 afterwards).
It is not your imagination that your two stage snow blower blows snow farther to one side than the other. My old Toro/Wheelhorse blows snow like crazy to the right, and farts it out to the left. This is due to the direction that the second stage impeller spins. With mine to the right the impeller slings the snow in a nice arc up and out the chute. To the left and it slings it against the side of the chute and it bounces off and doesn't go anywhere near as far. If you're clearing a driveway where you can only throw snow to one side and the snow is really heavy, position your chute so it throws the snow the farthest. In my case it is to the right. I then position my machine at the left side of the driveway and blow about 12 feet. Then I back up and move one width right and blow again, repeating until I've cleared that section. I do this partly because it blows much farther to the right, and partly because it is so heavy and awkward to run in reverse for long sections (this is an old machine from 1973 made from welded iron plate - It's very heavy).
Don't leave gas/petrol in the tank when the machine is put away for storage unless you have added fuel stabilizer. Years ago when gas was pure gas you could get away with this as the gas would last over a year before starting to deteriorate and turn into varnish. With today's gas there is a high ethanol content along with other additives. Ethanol in gas makes for cleaner emissions. But ethanol is corrosive to un plated metal parts, absorbs water, makes gaskets and seals soften and swell or harden and crack that weren't designed to be used with ethanol, and causes gasoline to deteriorate and turn to varnish in a matter of months. The varnish gums up carburetor jets and float needle valves, and coats and hardens on intake valve stems. When that happens the valve will stick in the guide and when you try to start it the valve train will self destruct. Personally I recommend draining the tank at the end of the season, starting it up and letting the engine run until it stops. Take a rag or paper towel and if there is a drain button on the bottom of the float bowl press it and let the last few drops of fuel drain out. Then spray some WD 40 in the intake and turn it over a few times to distribute it over the valves and cylinder. Pull the spark plug and spray some in the cylinder as an extra precaution. Don' t use gas from a can if it is more than 6 months old. Yes, this is a pain in the butt but so is working the hours needed to buy yourself a new snow blower. On a separate page I've written up the Pros and Cons of ethanol use in gasoline.
If the engine starts but runs poorly and is down on power and the plugs and points are OK, have a look at this separate page detailing how to clean and adjust the carburetor main jet.
A very good reference for working on these engines is the Mechanic's Handbook, 3 to 10 H. P. and OVM120 Tecumseh Engines, Form 692509. According to Amazon it's out of print but surprisingly I found it on the shelf at the local Barnes & Noble bookstore. It is invaluable if you want to do the work yourself.
Good Luck!
Once you've had enough fun getting your machine fixed up and running, visit my Aviation and Military Museums Directory. Why? Well Why not!!!